If you want to create a heat shield for a wood stove with your own hands, you will need a few materials and some creative approach. A sheet heat shield will help protect surrounding surfaces from excessive heat and reduce the risk of fire.
Here is a step-by-step guide on how to create a heat shield for a wood stove:
Step 1: Measure the space behind the stove. Determine the dimensions of the shield you will need to cover the back wall and side surfaces of the stove.
Step 2: Choose the appropriate material. For the heat shield, you can use fire-resistant fiberglass insulation or a metal sheet that can withstand high temperatures. Visit a specialized store or an online shop to find the suitable material.
Step 3: Construct the frame. Use metal strips or wire to create a sturdy frame for the shield. Form a frame that matches the dimensions you measured in the first step.
Step 4: Attach the material. Stretch the fire-resistant fiberglass insulation or weld the metal sheet to the frame. Ensure that the material fits tightly and covers all the back and side surfaces of the stove.
Step 5: Install the shield. Place the heat shield directly behind the stove to effectively reflect and dissipate heat.
Step 6: Check for safety. Make sure the shield is securely fastened and does not come into contact with hot stove surfaces. Verify that it provides a sufficient distance from combustible materials.
Following these steps will help you create a homemade heat shield for your wood stove. Remember to prioritize safety and always take necessary precautions when working with heat sources.
Also, don't forget to comply with all local norms and regulations regarding the use of wood stoves. If necessary, consult with local authorities to learn about the requirements and regulations related to heat shields for wood stoves.
Creating your own heat shield for a wood stove can be an exciting project, but it's important to prioritize safety and approach its implementation responsibly.

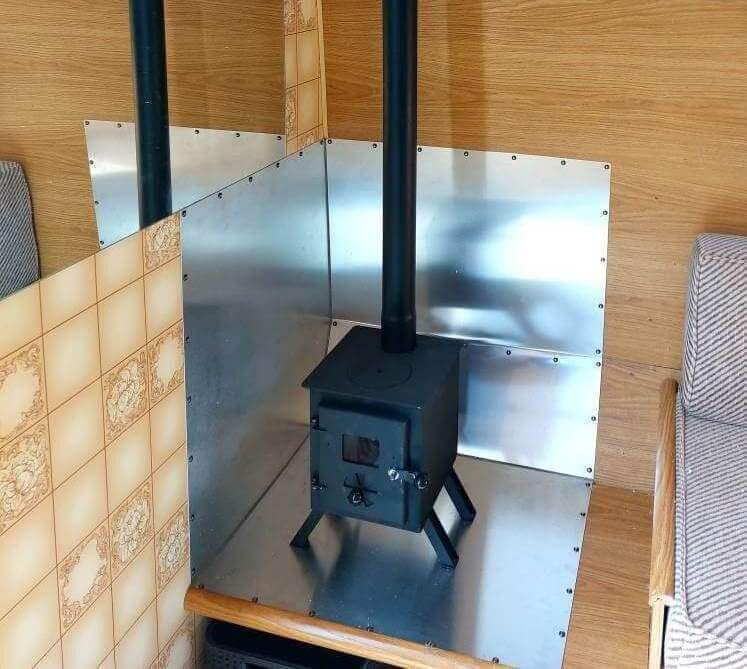
Our wood stove customers usually use stainless steel sheets. They are practical and get the job done effectively
Creating a heat shield from a metal sheet for a wood stove can be accomplished as follows:
Step 1: Measure the space behind the stove. Determine the dimensions of the shield that correspond to the stove's back wall and side surfaces.
Step 2: Acquire a metal sheet. Choose a metal sheet that can withstand high temperatures and is suitable for use as a heat shield. It should be thick and durable enough for the purpose.
Step 3: Prepare the tools and materials. You will need the following tools: a measuring tape, metal shears or a metal-cutting saw, pliers, a welding machine (if planning to weld the components), metal angles or strips for creating the shield's frame, and a marker or pencil for marking the metal.
Step 4: Cut and shape the metal sheet. Using metal shears or a metal-cutting saw, cut the metal sheet according to the measured dimensions. Ensure that the edges are straight and smooth.
Step 5: Create the frame. Use metal angles or strips to create a sturdy frame for the shield. Weld or attach the frame to the metal sheet, forming a frame that will hold the shield in place.
Step 6: Secure the shield. Install the metal sheet inside the frame and secure it using welding, bolts, rivets, or other suitable fasteners. Ensure that the metal sheet fits snugly against the frame and completely covers the stove's back and side surfaces.
Step 7: Test the shield. Before using the stove, ensure that the heat shield effectively reflects heat and prevents surrounding materials from overheating. Test its functionality under various heating conditions.

The heat screen is installed and the oven is ready for use
Step 8: Maintain and upkeep the shield. Regularly check the condition of the heat shield and remove accumulated dust and dirt. Perform repairs or replacement as needed.
It is important to remember that creating and installing a heat shield for a wood stove requires specific skills and knowledge. If you are unsure of your abilities or lack relevant experience, it is recommended to seek professional assistance in order to install a reliable and safe heat shield for your wood stove.
When choosing a metal sheet for creating a heat shield for a wood stove, several factors should be considered:
Heat resistance: Pay attention to the heat resistance of the material. Ideally, choose a metal sheet that can withstand high temperatures, typically over 600°C. Materials such as stainless steel or fire-resistant steel are good options for heat shields.
Thickness: Consider the thickness of the metal sheet. Thicker sheets will better handle high temperatures and provide reliable protection. It is recommended to choose a sheet with a thickness of at least 1.5 mm.

Sometimes pieces of the sheet can simply be nailed to a wooden surface with a hammer
Corrosion resistance: Take into account that the stove may be exposed to moisture and other aggressive substances, so select a metal sheet with good corrosion resistance. Stainless steel is an excellent choice as it has high corrosion resistance.
Size and shape: Select a metal sheet that can be easily cut and shaped according to the dimensions and shape of the shield you plan to create.
Availability and cost: Consider the availability and cost of the chosen material. Check for local suppliers of metal sheets and compare prices to choose the optimal option for your needs.
In general, stainless steel, fire-resistant steel, or other heat-resistant metals are good choices for the metal sheet of a wood stove heat shield.